Sorry to keep bouncing around. Hopefully this is the last time. I will not be updating this blogger blog any more.
Tuesday, September 29, 2009
Monday, September 21, 2009
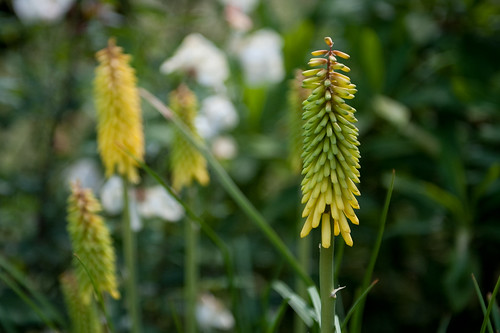
Depth of Field
Depth of field or DOF, is a term used to specify the area of a scene that is in focus. A “shallow depth of field” has the subject sharp in focus, but the rest of the foreground and background is out of focus. The background and foreground appear soft. This is a great technique for getting your subject to stand out from the background. Take a look at this picture. You can see how I’ve made the background flowers out of focus so that subject flower stands out more.
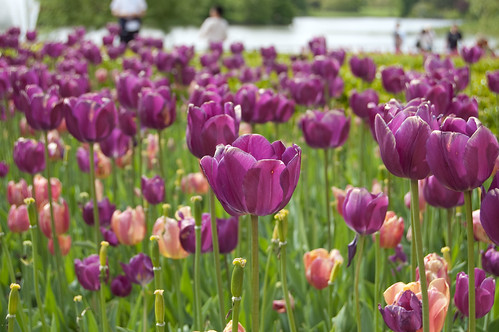
Here is an example of where I didn’t do a great job separating the subject from background. I wanted just the first tulip to be the center of focus, but all the background is in focus too, and it’s distracting:
There are three things the affect the size of your Depth of Field: Focal length, aperture, and distance from the subject. I will go into the technique more later, but to summarize:
- Focal Length: The more zoom, the shallower the DOF
- Aperture: The wider the aperture (small F-Number) , the shallower the DOF
- Distance from subject: the closer to the subject, shallower the DOF.
Monday, September 14, 2009
The Basics - Aperture
Aperture is one of those photography terms that intimated me at first. It sounds quite technical, and even the units, F-Numbers, don’t make a lot of sense. Changing your aperture is a very powerful tool to a photographer, and there are many reasons why you’d chose a certain value, however, it again all comes down to light. In combination with shutter speed, aperture controls the amount of light hitting your image sensor. The more light, the brighter your image, the less light, the darker your image.
Technically, aperture refers to the size of the opening in the lens. Take a look at the example below. The top image is a wide or large aperture (lots of light), while the bottom image is a smaller aperture (just a small amount of light).

The other hard to grasp part of aperture is the numbering system. Aperture uses F-numbers or F-stops. It seems counter intuitive to me, however, the smaller the number, the larger the opening. So in the pictures above, the top lens might have an aperture of f/2 while the lower image has f/16. A trick I use to help me remember how F-numbers work was given to me by my photography professor… “think about inflating a cartoon bike tire. If you inflate it with a lot of pressure, the hole in the middle will get smaller” More pressure = tighter aperture = higher F-Number. Not sure if that helps you, but it works for me.
These images are all shot keeping the shutter speed constant and just adjusting aperture (which will cause them to be under/over exposed).
Overexposed with wide aperture: 1/10 sec, f/5.6

Proper Exposure with medium aperture: 1/10 sec, f/11

Underexposed with small aperture (big f-number): 1/10 sec, f/22

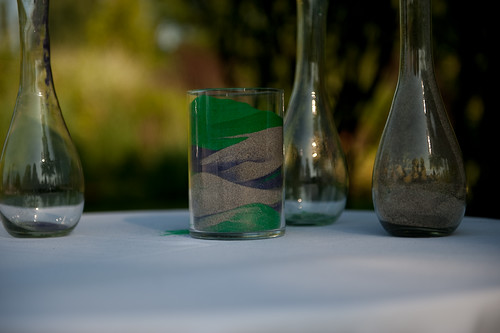
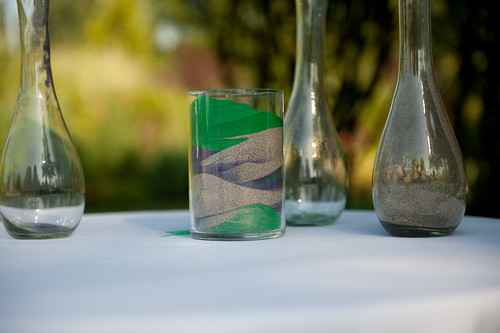
Aperture also has another effect on your images beyond how bright or dark your image is. After all, why would you need 2 ways to control this, shutter speed and aperture. What aperture does is also change the amount of your image that is in focus. This is referred to as the depth of field. I’ll cover depth of field in a later post, however, to illustrate the effects, take a look at the three images I’ve shot below.
Exposed properly, but with different aperture/shutter speed combinations, so you can see the depth of field effects.
½ sec, f /22 (all 3 quarters are in focus) – Slow shutter speed because aperture is small. This lets in enough light.

1/10 sec, f/11 (Center quarter is in focus, but back is out of focus, and most of front is out of focus) – Faster shutter speed because less light is needed when aperture is larger.

1/40 sec. f/5.6 (center quarter is the only one that is in focus) – Even faster shutter speed because aperture is all the way open.

This was another resource that I found helpful if you want to learn more:
http://www.photoaficionado.com/situationroom/aperture.html
Saturday, August 29, 2009
Shutter Speed
Shutter speed refers to the amount of time that your image sensor is exposed to light. Refer back to my earlier post on the anatomy of a DSLR, and you’ll see that the shutter is in front of the image sensor. So, the “faster” your shutter speed, the less time light (which is the image) is hitting the image. “Slower” shutter speeds, means that the image sensor is exposed for a longer period of time.
Shutters are normally very fast… fractions of a second. That’s all the light you need to make a photo. Shutter speeds range from about 1/6000th of a second to about 8 seconds. The light you have available to take a picture, determines how you set your shutter speed. 8 seconds, (denoted 8” on the back of the camera) would be used for incredibly low light (ie, Taking pictures of the stars). 1/6000th of a second (denoted 6000 on the back of the camera) would be used for taking pictures when there is a lot of light available (ie, middle of the day, pointed at the sun).
Under normal, daytime conditions, I shoot in the range of 1/60th to 1/3200th of a second. I generally try to use the fastest speed that the light will allow. The faster the shutter, the less chance I will cause the image to be blurry by shaking the camera. This type of blur is called “motion blur”, and causes everything in your pictures to appear out of focus. If I’m going to hand-hold my camera (not use a tripod), I won’t set it below 1/60th of a second. It is next to impossible to hold still enough at this speed.
Take a look at the three photos below to see the effects of shutter speed. I’ve kept all the variables the same (Subject, time of day, aperture, white balance, iso camera location) except shutter speed.
This image has the “fastest” shutter speed. 1/2500th of a second.

This image is a little slower. 1/2500th of a second.

This is the slowest image 1/800th of a second.

Notice that the photos get darker the faster the shutter speed is. This is because less light is hitting the sensor. 1/2500th of a second’s worth of light vs. 1/800th of a second.
So, when shooting in the manual mode, I set the aperture, and then adjust the shutter speed until the image is exposed properly. The camera will also do this automatically for you if you shoot in Aperture Priority Mode.
Friday, August 21, 2009
Photography: It’s all about Light
When thinking about photography, it all really comes down to light. That’s what goes onto the cameras sensor, and that is what makes an image. Exposing the perfect picture comes down to your ability to control the light that comes into the camera. There are three settings on your camera that really control the light coming in.
- 1. Aperture: The size of the “hole” light comes through to your sensor
- 2. Shutter Speed: The amount of time light is being captured by the sensor
- 3. ISO: The sensitivity of your sensor.
I’ll cover each of these in separate blog posts. But being able to control these three settings are what will enable you to capture that perfect shot. These all three come together to become the “exposure” of the picture. You’ve probably heard the term “overexposed” or “underexposed” before. By changing aperture, shutter speed, and ISO, you can control the amount of light in the picture and get the perfect exposure.
Below are three examples of exposure:
Underexposure
Overexposure

Correct Exposure
Thursday, August 20, 2009
Adobe Photoshop Lightroom: A great way to organize images.
Full Disclosure: I work for Adobe, so I may be biased… however, I don’t recommend anything I don’t use myself.
I’ve been using Photoshop Lightroom for over a year now, and I still love it. Prior to finding Lightroom, I’d been taking digital pictures for about 8 years, and had never come up with a system that I liked for storing and cataloging images. I’d tried using Windows Explorer file system, iPhoto, and up until last year, I was pretty happy with Picasa, but Lightroom has blown them all away.
There are several functions in Lightroom beyond just organizing (all of which I love), but for just remembering what/where/when you took a picture, the Library module in Lightroom is awesome. Right from importing your photos from you camera, it keeps everything in one place. For safety, it automatically makes copies of your pictures for auto-backup. (having lost a lot of data, I can’t stress this enough).
I’m gonna spend a lot of time talking about Lightroom in this blog as I learn more. It is super powerful and has tons of features that’ll probably take me months to learn, however if you use it as nothing more than just an organizer, you’ll still be happy.
A couple things to point out: Lightroom 2 is available for a free 30-day trial from Adobe.
Also, to get started using the software, I highly recommend the Lynda.com training It’s done by Chris Orwig and really helped get me going with the software.
Wednesday, August 19, 2009
Using Autofocus
The ability for a camera to automatically focus is awesome. The fact that your camera can look at an object, determine if it is sharp enough, and change the focus blows me away every time. When I first got my DSLR cameras, one thing I’ve noticed is that it was unpredictable on what it would focus on. I’d look through the viewfinder, and want to focus on the person in my shot, and it would focus on some leaf in the foreground. Or it would focus on the closest person instead of the person in the middle. Turns out, my Nikon has some settings for the focus mode that I didn’t know about. The factory had it set to focus on the closest object, regardless of where it was. This wasn’t working for me, because I didn’t always want the closest object in focus.
What I’ve done to simplify my life and make my autofocus only focus on what is in the direct center of my viewfinder. Looking through my Nikon, (D40) I have an indicator that looks like:

These boxes are the focus area indicators. I’ve changed the settings in the back menu (check your manual to see what menu), so that only the center square is put in focus.
I know what you are saying, “what if I don’t want the center to be in focus, what if I want something on the right or left to be in focus. I that case you put the item you want to focus on in the center brackets, press the shutter button half way down and then re-compose you image. This blog talks about some of the other features of autofocusing that I won’t rewrite here: http://www.kenrockwell.com/nikon/d80/af-settings.htm
I also noticed that sometimes the camera wouldn't focus, it just kept searching, and never finds a focus distance. The autofocus in your camera uses lines of contrast to focus. So you need to look at the edge of an object to get the camera to focus. It you are trying to focus on something all the same color, the camera won’t know how to make it sharp
Monday, August 10, 2009
Apologies for Being Absent
It’s been pretty obvious that I’ve been neglecting my blog. I’m going to make an effort to update it more regularly. Just because my entries stopped, didn’t mean my interest in photography has waned. I’ve still been shooting and learned a couple new things along the way. I’d like to ask a favor of my readers, please make comments. I’d love to hear your feedback on what I’m writing.
Thursday, April 9, 2009
Becoming Master of Your Domain: Camera Modes
One of the first things that new camera owners start to play with on their DSLR is the little Mode Dial on the top of the camera:
Nikon
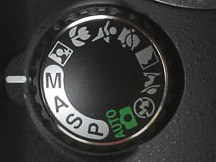
Canon
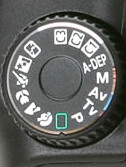
Everyone is always tempted to just put it on Auto, and leave it, but here’s what these different Mode Dial symbols mean (I’m going to focus on Nikon and Canon):
Nikon
Canon
Everyone is always tempted to just put it on Auto, and leave it, but here’s what these different Mode Dial symbols mean (I’m going to focus on Nikon and Canon):
| Nikon | Canon | |
| P | P | Program Mode: this is almost automatic, but allows you to change a couple settings like ISO and white balance. It is a way to override some of the decisions your camera’s auto sensor is making. |
| S | Tv | Shutter Priority: You chose the shutter speed, and the camera selects an appropriate aperture value. This is a semi-auto mode, but it is great for getting a specific effect. For example, it you want to get a crystal clear picture of a track runner, you need a fast shutter speed to stop the runner. Otherwise you will get a blur. In this mode, you set the shutter speed fast, and the camera picks the appropriate aperture to get enough light. |
| A | Av | Aperture Priority: You chose the aperture value, and the camera selects an appropriate shutter speed. This is a semi-auto mode, but it is great for getting a specific effect. For example, it you want to take a “selective focus” picture of a flower (flower in focus, background out of focus) you need a wide aperture (low f-number). This will put the flower in crisp focus, and have the background all out of focus. The camera then compensates with the correct shutter speed to let the right amount of light in. |
| M | M | Manual: Allows everything to be set by the user. I shoot most of the time in this mode. |
| Auto | Green Box (Auto) | Auto: “photography for dummies”. This setting uses the camera’s image sensor to decide all settings. It usually gets close, but I’ve found that I can usually do a better job controlling brightness, white balance, and shooting style using the Auto Mode |
| Icon | Icon | Scene Select: the second half of the camera mode dial has little pictures on it that are meant to specify a shooting scenario. They basically change some of the pre-set features for each scene type. I find them useless. |
Monday, April 6, 2009
Anatomy of a DSLR
Now that you have your DSLR, lets look at the pieces that make it work. Below is a very crude diagram of a DSLR. I’ve called out each of the major components:
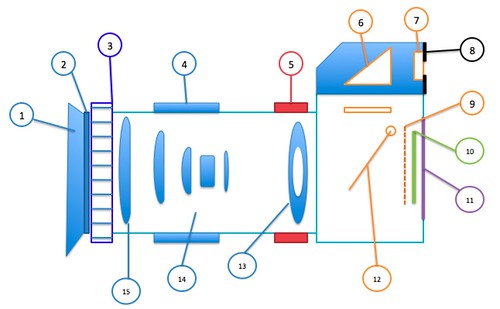
1. Lens Hood: this is used to flag light from the lens. I’ll cover what flagging means later, but we want to block extra light coming in from the sun or lamps from hitting our lens, and only have the light from the subject enter the lens.
2. UV filter: this is a little filter that covers the front of your lens. These are about $20 and protect you lens from scratches (it’s much cheaper to replace the UV filter than the whole lens).
3. Focus ring: enables you to manually focus the lens. When you are in auto-focus mode, you won’t need to use this at all. Depending on you lens/camera, it can also be located at #5.
4. Zoom: changes the zoom of the lens, brings objects closer or further away.
5. Focus ring: see #3
6. Prism: A mirror to reflect what is being seen by your lens up to you eye.
7. Diopter: a slider next to the viewfinder that allows you to adjust the focus. This is used for people who need corrective vision. (most people just leave it alone and look through the lens with their glasses)
8. Viewfinder: Look through the viewfinder to see what you have in frame.
9. Shutter: The shutter is what allows the light to hit your image sensor for a set length of time.
10. Image Sensor: the film of the digital camera. This captures the light, and converts it to the digital image.
11. LCD: The screen on the back of your camera that allows you to modify the camera settings and review your images after you captured them.
12. Mirror: is in the down position to allow the image to be reflected up to the viewfinder. When you press the shutter button to take a picture the mirror flips up and lets the light through the shutter onto the image sensor.
13. Aperture/F-Stops/Diaphragm: Aperture, is measured in f-stops. This is the hole in the lens that allows the light to pass through. It is made up of blades that form the diaphragm. The larger the f-number, the smaller the hole in the diaphragm is. I will cover how this works in detail later.
14. Lens elements: allows the lens to focus and gather the light onto a point source (in this case, the image sensor)
15. Objective Lens: This is the front lens.
Wednesday, April 1, 2009
Buying Guide - Pro level D-SLR’s
If you have a few thousand dollars to spend, and really want to look like you know what you are doing, I’d recommend you look into a pro level DSLR. To be totally honest, I don’t have the cash for these, so I’m probably not the best person to offer advice. What I can say are a few of the benefits:
• Higher Mexapixel – More sensors in the camera means higher resolution images
• Better in low light – These cameras look better at higher ISO’s
• Better Kit lenses – they pack these into the costs
• More buttons, and dials – the camera body is bigger so they fit in things like LCD displays, separate aperture and shutter speed controls, white balance buttons, etc.
• Video – some of the newer models (Canon 5D – Mark II and Nikon D90) are offering video capabilities.
Along with the higher price tag, these cameras are bigger and weigh more, so be prepared to carry a heavier load.
I’d strongly advise against spending this much money for your first camera. Personally, I got the cheapest camera I could to learn with. My plan is to continue using it till I’ve out grown its capabilities, then upgrade to something a little snazzier!!! But that’s just me.
Monday, March 23, 2009
Consumer Level D-SLR Cameras
So, the first question is: What is a D-SLR?
Answer: It stands for Digital Single Lens Reflex. In plain English, it is a digital camera, where you look through the lens that you actually take the picture through. (most point and shoot cameras have a separate view finder) You look down though a mirror that points out the lens. When you press the button (shutter) to take a picture, the mirror lifts up and exposes the image sensor (film) and that captures the image. Here’s a great diagram of how a D-SLR works from “how stuff works” (just replace the film with digital image sensor):

D-SLR cameras are great for photographers who consider taking pictures an art and think of it more as a hobby. These cameras allow for tons of control in how light is captured by your camera or how to compose your picture. You can also change lenses so you can take pictures in unusual situations, like super close up (macro) or things very far away (zoom). They also make it very easy to change the aperture, shutter speed, and white balance.
Consumer level D-SLR have a couple limitations compared to their pro model counterparts. First, they usually have only one dial on the camera body to change both aperture and shutter speed. This is a bit of an inconvenience, but still better than going into menus to change, like in the consumer level cameras. Also, they only have one display to show what your camera settings are (battery life, images left, aperture, shutter speed, iso, etc). This screen also shows the preview of your image, so it is has to alternate between different views when you want to change settings.
The consumer level D-SLR’s are a great entry point for someone who wants to learn more about photography, but doesn’t want to plunk down several thousand dollars to get started. I bought a Nikon D40 for around $600:

D-SLR cameras come in two parts, the body and the lens. You can buy these items separately, however, they also sell them as ‘kits’, which is a body and lens combo. You can also find them with multiple lenses, an included memory card, extra battery, etc. The one I got came with 2 Nikon lenses; an 18-55mm and a 55-200mm. This allows me to have a bit more zoom when I swap lenses. Neither of these are “high quality” lenses, but they do the trick for just learning.
This is the kit that I bought off Amazon.
Another good set of cameras to look at is the Canon Rebel. I don’t know much about the Canon lineup, but I’ve heard good things.
Answer: It stands for Digital Single Lens Reflex. In plain English, it is a digital camera, where you look through the lens that you actually take the picture through. (most point and shoot cameras have a separate view finder) You look down though a mirror that points out the lens. When you press the button (shutter) to take a picture, the mirror lifts up and exposes the image sensor (film) and that captures the image. Here’s a great diagram of how a D-SLR works from “how stuff works” (just replace the film with digital image sensor):
D-SLR cameras are great for photographers who consider taking pictures an art and think of it more as a hobby. These cameras allow for tons of control in how light is captured by your camera or how to compose your picture. You can also change lenses so you can take pictures in unusual situations, like super close up (macro) or things very far away (zoom). They also make it very easy to change the aperture, shutter speed, and white balance.
Consumer level D-SLR have a couple limitations compared to their pro model counterparts. First, they usually have only one dial on the camera body to change both aperture and shutter speed. This is a bit of an inconvenience, but still better than going into menus to change, like in the consumer level cameras. Also, they only have one display to show what your camera settings are (battery life, images left, aperture, shutter speed, iso, etc). This screen also shows the preview of your image, so it is has to alternate between different views when you want to change settings.
The consumer level D-SLR’s are a great entry point for someone who wants to learn more about photography, but doesn’t want to plunk down several thousand dollars to get started. I bought a Nikon D40 for around $600:
D-SLR cameras come in two parts, the body and the lens. You can buy these items separately, however, they also sell them as ‘kits’, which is a body and lens combo. You can also find them with multiple lenses, an included memory card, extra battery, etc. The one I got came with 2 Nikon lenses; an 18-55mm and a 55-200mm. This allows me to have a bit more zoom when I swap lenses. Neither of these are “high quality” lenses, but they do the trick for just learning.
This is the kit that I bought off Amazon.
Another good set of cameras to look at is the Canon Rebel. I don’t know much about the Canon lineup, but I’ve heard good things.
Thursday, March 19, 2009
Consumer Model Cameras with Advanced Settings
These cameras are generally larger and more expensive than the point and shoot cameras. The reason to use the advanced cameras over a point and shoot is they allow the photographer to change some key settings:
• Aperture
• Shutter Speed
• White balance
As you become more advanced with your photography, you will begin to use these settings to get the desired effects from lighting, focus, and color. The Consumer Models let you change these settings (although they are buried in the menus of the camera). A great example is the Canon PowerShot A720IS (http://www.dpreview.com/reviews/canona720is/). It allows the user to shoot in Manual mode (set both aperture and shutter speed) to have more control over the images.
The difference between these cameras and their D-SLR counterparts are interchangeable lenses, and on-camera controls for adjusting aperture and shutter speed. If you are shooting a lot of pictures in changing light conditions, it is pretty annoying to have to keep navigating through menus to update these settings.
All in all, these are great for cost conscious photographers who want to learn photography, but don’t want to invest in an expensive D-SLR.
Monday, March 9, 2009
Changed the URL to blog.jordanldavis.com
To make things easier, I've changed the blog to a sub-domain. blog.jordanldavis.com.
Friday, March 6, 2009
Digital Zoom is a Scam
Cameras advertise that they have 15x digital zoom, which means absolutely nothing! All digital zoom does is enable the camera to blow up the picture and crop the edges. You can do the same using photo editing software on your computer or even through some print providers. (I’ll also cover this later). They say this is a big feature, and even advertise the camera as having tons of zoom. Don't fall for it. Let me show you the difference between optical zoom and digital zoom.
Here are some examples of optical zoom I stood in the same place and took pictures of this water bottle.
This image with 1x optical zoom:

This image is 3x optical zoom:

This is "real" zoom. You can notice that with the 3x optical zoom, the image is still sharp and clean. This is because it contains the same number of pixels as the 1x optical zoom.
Now, this is an example of digital digital zoom. I used the digital zoom on the camera and went to 15x:

You can see in the image, that it has lost some of its sharpness. Look under the red band of the label and you will see some jagged edges, as well as the lettering in crystal. The interesting thing is that I can produce the exact same image with the exact same sharpness by just using a crop tool on my desktop:

This picture just a crop of the picture above from 3x OPTICAL zoom. Notice how is just as sharp as the 15x digital zoom.
Please, don't be fooled by digital zoom!
Here are some examples of optical zoom I stood in the same place and took pictures of this water bottle.
This image with 1x optical zoom:
This image is 3x optical zoom:
This is "real" zoom. You can notice that with the 3x optical zoom, the image is still sharp and clean. This is because it contains the same number of pixels as the 1x optical zoom.
Now, this is an example of digital digital zoom. I used the digital zoom on the camera and went to 15x:
You can see in the image, that it has lost some of its sharpness. Look under the red band of the label and you will see some jagged edges, as well as the lettering in crystal. The interesting thing is that I can produce the exact same image with the exact same sharpness by just using a crop tool on my desktop:
This picture just a crop of the picture above from 3x OPTICAL zoom. Notice how is just as sharp as the 15x digital zoom.
Please, don't be fooled by digital zoom!
Thursday, March 5, 2009
Buying a point and shoot compact camera
If a camera can fit in your pocket, chances are, it is a point and shoot. These cameras are great for a night out on the town, or anytime you want to take pictures, but don’t want to lug around a heavy camera. These cameras are generally the least expensive and range in price from under a hundred to around $400. Most point and shoots purchased in the last couple years take pretty great pictures. So, you are probably asking yourself, if these cameras are the smallest and lowest price, why don’t I just stop here, why do I need anything more?
Control, control, control! As we start to get into more advanced features of the camera, it becomes important to be able to change different ‘setting’ that the camera uses to capture the image. The two biggest ones are shutter speed and aperture (don’t worry if you don’t know what those are right now, I’ll be covering them in later entries).
If you look at the controls on the point and shoot cameras,

you’ll notice that they only have an auto setting and a couple pre-sets.

They don’t allow you to individually change the shutter speed or aperture. The camera relies on its internal computer and sensors to make a decision about how these things should be set. It usually gets pretty close, but you can’t do the fine-tuning that makes your images look really fantastic. There isn’t an image sensor or camera processor that can make decisions as well as the human eye… at least not yet.
Also, interchangeable lenses! The point and shoots come with one lens that is attached to the camera. That is the only lens that you will be able to use. If you want to shoot close up pictures, wide angle, or super zoomed pictures, you are out of luck. Point and shoot cameras do have the ability to zoom, and usually say something like “3x optical zoom”. This means that you can make an image 3 times larger. However, ever other camera uses a measure of mm to denote the camera’s zoom. A typical zoom range for a point and shot with “3.8x optical zoom“ is from 28-105mm, but that is hard to gauge, because they have different starting points to do 3x. I’ll get into more detail about what those numbers mean later, but they are useful for comparison.
Also, remember that DIGITAL ZOOM IS A SCAM!!! More on this tomorrow.
Personally, I have a point and shoot that I carry around with me when I want to take some snapshots. It’s a Canon SD850IS.

I bought it two years ago and carry it around when I don’t want to deal with the bigger cameras.
Examples: Canon SD970IS, Nikon Coolpix S230, Sony Cyber-shot DSC-G3
Thanks to DPReview.com for the camera images above.
Control, control, control! As we start to get into more advanced features of the camera, it becomes important to be able to change different ‘setting’ that the camera uses to capture the image. The two biggest ones are shutter speed and aperture (don’t worry if you don’t know what those are right now, I’ll be covering them in later entries).
If you look at the controls on the point and shoot cameras,
you’ll notice that they only have an auto setting and a couple pre-sets.
They don’t allow you to individually change the shutter speed or aperture. The camera relies on its internal computer and sensors to make a decision about how these things should be set. It usually gets pretty close, but you can’t do the fine-tuning that makes your images look really fantastic. There isn’t an image sensor or camera processor that can make decisions as well as the human eye… at least not yet.
Also, interchangeable lenses! The point and shoots come with one lens that is attached to the camera. That is the only lens that you will be able to use. If you want to shoot close up pictures, wide angle, or super zoomed pictures, you are out of luck. Point and shoot cameras do have the ability to zoom, and usually say something like “3x optical zoom”. This means that you can make an image 3 times larger. However, ever other camera uses a measure of mm to denote the camera’s zoom. A typical zoom range for a point and shot with “3.8x optical zoom“ is from 28-105mm, but that is hard to gauge, because they have different starting points to do 3x. I’ll get into more detail about what those numbers mean later, but they are useful for comparison.
Also, remember that DIGITAL ZOOM IS A SCAM!!! More on this tomorrow.
Personally, I have a point and shoot that I carry around with me when I want to take some snapshots. It’s a Canon SD850IS.
I bought it two years ago and carry it around when I don’t want to deal with the bigger cameras.
Examples: Canon SD970IS, Nikon Coolpix S230, Sony Cyber-shot DSC-G3
Thanks to DPReview.com for the camera images above.
Tuesday, March 3, 2009
Buying a Digital Camera
If you are like me, then buying a digital camera is an overwhelming process. There are literally hundreds of cameras on the market and dozens of places to buy. Prices can range from under a hundred dollars to a several thousand. I’m not an expert on camera selection, but here is the thought process and learning I had when I selected my camera.
I’ve broken the digital camera market down into four “styles” of cameras:
Each camera has a distinct purpose and situation that they are best suited for. The best advice I have is to choose the one that makes the most sense for your photographic needs, but that also fits in your budget. Buying the most expensive camera isn’t going to make you a better photographer. Knowing how to use the camera you have is what is most important. As the week goes on, I’ll create an entry for each segment of camera and walk you through the defining characteristics of each. I’ll also share what I bought, and why.
For now, a couple resources to check out are:
Just a note here, I’m exclusively talking about digital cameras. If you are interested in traditional film I don’t really have any advice for you.
I’ve broken the digital camera market down into four “styles” of cameras:
- Point and shoot compact cameras
- Consumer model cameras with advanced settings
- Consumer style D-SLR cameras
- Pro level D-SLR’s
Each camera has a distinct purpose and situation that they are best suited for. The best advice I have is to choose the one that makes the most sense for your photographic needs, but that also fits in your budget. Buying the most expensive camera isn’t going to make you a better photographer. Knowing how to use the camera you have is what is most important. As the week goes on, I’ll create an entry for each segment of camera and walk you through the defining characteristics of each. I’ll also share what I bought, and why.
For now, a couple resources to check out are:
- DP Review (www.dpreview.com): Checkout the buying guide and camera database
- Consumer Reports (www.consumerreports.org): Good for reliability and feature comparison, but the site charges to see everything
- CNet Digital Cameras (www.cnet.com): This link takes you to the digital camera section. There are a lot of good reviews here.
Just a note here, I’m exclusively talking about digital cameras. If you are interested in traditional film I don’t really have any advice for you.
Wednesday, February 25, 2009
www.jordanldavis.com is now live
Success!!! I was able to map the domain I bought and point my blogger account to that URL. www.jordanldavis.com is now live and running.
I'm starting this blog to chronicle my experience learning to become a photographer (or at least learn how to use my camera). I've been lucky enough to have the opportunity to enroll in a photography course at the Academy of Art University in San Francisco, and wanted to share that knowledge with friends and families. I'll try to distill each lesson down and post it online so that others can benefit from what I'm learning. It will start out pretty basic with camera instructions, and hopefully get more and more advanced ans my knowledge and skills improve.
I'll also try to post samples of my work and share some of the feedback I get from class reviews. Please feel free to leave me comments, I'll try to reply to them.
Setting Up a Blog
Well, that was easy, I now have a blog. As part of this exercise I'm going to see if I can get this blog to display on www.JordanLDavis.com.
Subscribe to:
Posts (Atom)


