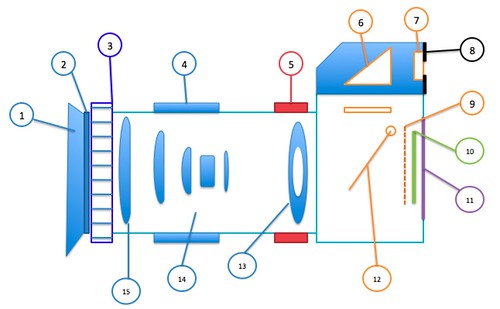
1. Lens Hood: this is used to flag light from the lens. I’ll cover what flagging means later, but we want to block extra light coming in from the sun or lamps from hitting our lens, and only have the light from the subject enter the lens.
2. UV filter: this is a little filter that covers the front of your lens. These are about $20 and protect you lens from scratches (it’s much cheaper to replace the UV filter than the whole lens).
3. Focus ring: enables you to manually focus the lens. When you are in auto-focus mode, you won’t need to use this at all. Depending on you lens/camera, it can also be located at #5.
4. Zoom: changes the zoom of the lens, brings objects closer or further away.
5. Focus ring: see #3
6. Prism: A mirror to reflect what is being seen by your lens up to you eye.
7. Diopter: a slider next to the viewfinder that allows you to adjust the focus. This is used for people who need corrective vision. (most people just leave it alone and look through the lens with their glasses)
8. Viewfinder: Look through the viewfinder to see what you have in frame.
9. Shutter: The shutter is what allows the light to hit your image sensor for a set length of time.
10. Image Sensor: the film of the digital camera. This captures the light, and converts it to the digital image.
11. LCD: The screen on the back of your camera that allows you to modify the camera settings and review your images after you captured them.
12. Mirror: is in the down position to allow the image to be reflected up to the viewfinder. When you press the shutter button to take a picture the mirror flips up and lets the light through the shutter onto the image sensor.
13. Aperture/F-Stops/Diaphragm: Aperture, is measured in f-stops. This is the hole in the lens that allows the light to pass through. It is made up of blades that form the diaphragm. The larger the f-number, the smaller the hole in the diaphragm is. I will cover how this works in detail later.
14. Lens elements: allows the lens to focus and gather the light onto a point source (in this case, the image sensor)
15. Objective Lens: This is the front lens.


0 comments:
Post a Comment