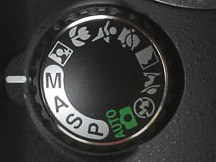
Thursday, April 9, 2009

Becoming Master of Your Domain: Camera Modes

One of the first things that new camera owners start to play with on their DSLR is the little Mode Dial on the top of the camera:

Nikon

inhandNikon

Canon
inhandCanon

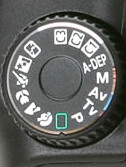
Everyone is always tempted to just put it on Auto, and leave it, but here’s what these different Mode Dial symbols mean (I’m going to focus on Nikon and Canon):

NikonCanon
P P Program Mode: this is almost automatic, but allows you to change a couple settings like ISO and white balance. It is a way to override some of the decisions your camera’s auto sensor is making.

S Tv Shutter Priority: You chose the shutter speed, and the camera selects an appropriate aperture value. This is a semi-auto mode, but it is great for getting a specific effect.

For example, it you want to get a crystal clear picture of a track runner, you need a fast shutter speed to stop the runner. Otherwise you will get a blur. In this mode, you set the shutter speed fast, and the camera picks the appropriate aperture to get enough light.

AAvAperture Priority: You chose the aperture value, and the camera selects an appropriate shutter speed. This is a semi-auto mode, but it is great for getting a specific effect.

For example, it you want to take a “selective focus” picture of a flower (flower in focus, background out of focus) you need a wide aperture (low f-number). This will put the flower in crisp focus, and have the background all out of focus. The camera then compensates with the correct shutter speed to let the right amount of light in.

MMManual: Allows everything to be set by the user. I shoot most of the time in this mode.

AutoGreen Box (Auto)Auto: “photography for dummies”. This setting uses the camera’s image sensor to decide all settings. It usually gets close, but I’ve found that I can usually do a better job controlling brightness, white balance, and shooting style using the Auto Mode

IconIconScene Select: the second half of the camera mode dial has little pictures on it that are meant to specify a shooting scenario. They basically change some of the pre-set features for each scene type. I find them useless.

Monday, April 6, 2009

Anatomy of a DSLR

Now that you have your DSLR, lets look at the pieces that make it work. Below is a very crude diagram of a DSLR. I’ve called out each of the major components:


DSLR Diagram


1. Lens Hood: this is used to flag light from the lens. I’ll cover what flagging means later, but we want to block extra light coming in from the sun or lamps from hitting our lens, and only have the light from the subject enter the lens.

2. UV filter: this is a little filter that covers the front of your lens. These are about $20 and protect you lens from scratches (it’s much cheaper to replace the UV filter than the whole lens).

3. Focus ring: enables you to manually focus the lens. When you are in auto-focus mode, you won’t need to use this at all. Depending on you lens/camera, it can also be located at #5.

4. Zoom: changes the zoom of the lens, brings objects closer or further away.

5. Focus ring: see #3

6. Prism: A mirror to reflect what is being seen by your lens up to you eye.

7. Diopter: a slider next to the viewfinder that allows you to adjust the focus. This is used for people who need corrective vision. (most people just leave it alone and look through the lens with their glasses)

8. Viewfinder: Look through the viewfinder to see what you have in frame.

9. Shutter: The shutter is what allows the light to hit your image sensor for a set length of time.

10. Image Sensor: the film of the digital camera. This captures the light, and converts it to the digital image.

11. LCD: The screen on the back of your camera that allows you to modify the camera settings and review your images after you captured them.

12. Mirror: is in the down position to allow the image to be reflected up to the viewfinder. When you press the shutter button to take a picture the mirror flips up and lets the light through the shutter onto the image sensor.

13. Aperture/F-Stops/Diaphragm: Aperture, is measured in f-stops. This is the hole in the lens that allows the light to pass through. It is made up of blades that form the diaphragm. The larger the f-number, the smaller the hole in the diaphragm is. I will cover how this works in detail later.

14. Lens elements: allows the lens to focus and gather the light onto a point source (in this case, the image sensor)

15. Objective Lens: This is the front lens.

Wednesday, April 1, 2009

Buying Guide - Pro level D-SLR’s

If you have a few thousand dollars to spend, and really want to look like you know what you are doing, I’d recommend you look into a pro level DSLR. To be totally honest, I don’t have the cash for these, so I’m probably not the best person to offer advice. What I can say are a few of the benefits:
• Higher Mexapixel – More sensors in the camera means higher resolution images
• Better in low light – These cameras look better at higher ISO’s
• Better Kit lenses – they pack these into the costs
• More buttons, and dials – the camera body is bigger so they fit in things like LCD displays, separate aperture and shutter speed controls, white balance buttons, etc.
• Video – some of the newer models (Canon 5D – Mark II and Nikon D90) are offering video capabilities.

Along with the higher price tag, these cameras are bigger and weigh more, so be prepared to carry a heavier load.

I’d strongly advise against spending this much money for your first camera. Personally, I got the cheapest camera I could to learn with. My plan is to continue using it till I’ve out grown its capabilities, then upgrade to something a little snazzier!!! But that’s just me.