Sorry to keep bouncing around. Hopefully this is the last time. I will not be updating this blogger blog any more.
Tuesday, September 29, 2009
Monday, September 21, 2009
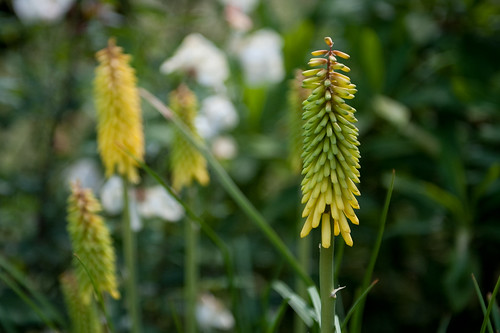
Depth of Field
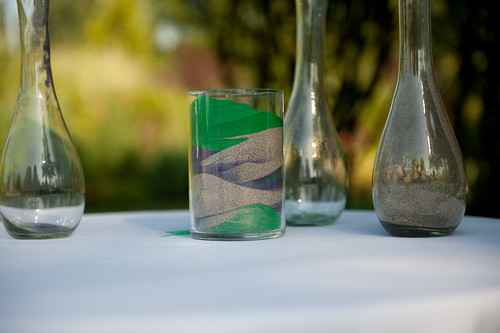
Depth of field or DOF, is a term used to specify the area of a scene that is in focus. A “shallow depth of field” has the subject sharp in focus, but the rest of the foreground and background is out of focus. The background and foreground appear soft. This is a great technique for getting your subject to stand out from the background. Take a look at this picture. You can see how I’ve made the background flowers out of focus so that subject flower stands out more.
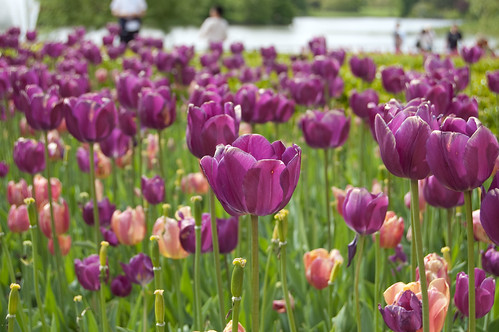
Here is an example of where I didn’t do a great job separating the subject from background. I wanted just the first tulip to be the center of focus, but all the background is in focus too, and it’s distracting:
There are three things the affect the size of your Depth of Field: Focal length, aperture, and distance from the subject. I will go into the technique more later, but to summarize:
- Focal Length: The more zoom, the shallower the DOF
- Aperture: The wider the aperture (small F-Number) , the shallower the DOF
- Distance from subject: the closer to the subject, shallower the DOF.
Monday, September 14, 2009
The Basics - Aperture
Aperture is one of those photography terms that intimated me at first. It sounds quite technical, and even the units, F-Numbers, don’t make a lot of sense. Changing your aperture is a very powerful tool to a photographer, and there are many reasons why you’d chose a certain value, however, it again all comes down to light. In combination with shutter speed, aperture controls the amount of light hitting your image sensor. The more light, the brighter your image, the less light, the darker your image.
Technically, aperture refers to the size of the opening in the lens. Take a look at the example below. The top image is a wide or large aperture (lots of light), while the bottom image is a smaller aperture (just a small amount of light).

The other hard to grasp part of aperture is the numbering system. Aperture uses F-numbers or F-stops. It seems counter intuitive to me, however, the smaller the number, the larger the opening. So in the pictures above, the top lens might have an aperture of f/2 while the lower image has f/16. A trick I use to help me remember how F-numbers work was given to me by my photography professor… “think about inflating a cartoon bike tire. If you inflate it with a lot of pressure, the hole in the middle will get smaller” More pressure = tighter aperture = higher F-Number. Not sure if that helps you, but it works for me.
These images are all shot keeping the shutter speed constant and just adjusting aperture (which will cause them to be under/over exposed).
Overexposed with wide aperture: 1/10 sec, f/5.6

Proper Exposure with medium aperture: 1/10 sec, f/11

Underexposed with small aperture (big f-number): 1/10 sec, f/22

Aperture also has another effect on your images beyond how bright or dark your image is. After all, why would you need 2 ways to control this, shutter speed and aperture. What aperture does is also change the amount of your image that is in focus. This is referred to as the depth of field. I’ll cover depth of field in a later post, however, to illustrate the effects, take a look at the three images I’ve shot below.
Exposed properly, but with different aperture/shutter speed combinations, so you can see the depth of field effects.
½ sec, f /22 (all 3 quarters are in focus) – Slow shutter speed because aperture is small. This lets in enough light.

1/10 sec, f/11 (Center quarter is in focus, but back is out of focus, and most of front is out of focus) – Faster shutter speed because less light is needed when aperture is larger.

1/40 sec. f/5.6 (center quarter is the only one that is in focus) – Even faster shutter speed because aperture is all the way open.

This was another resource that I found helpful if you want to learn more:
http://www.photoaficionado.com/situationroom/aperture.html
Saturday, August 29, 2009
Shutter Speed
Shutter speed refers to the amount of time that your image sensor is exposed to light. Refer back to my earlier post on the anatomy of a DSLR, and you’ll see that the shutter is in front of the image sensor. So, the “faster” your shutter speed, the less time light (which is the image) is hitting the image. “Slower” shutter speeds, means that the image sensor is exposed for a longer period of time.
Shutters are normally very fast… fractions of a second. That’s all the light you need to make a photo. Shutter speeds range from about 1/6000th of a second to about 8 seconds. The light you have available to take a picture, determines how you set your shutter speed. 8 seconds, (denoted 8” on the back of the camera) would be used for incredibly low light (ie, Taking pictures of the stars). 1/6000th of a second (denoted 6000 on the back of the camera) would be used for taking pictures when there is a lot of light available (ie, middle of the day, pointed at the sun).
Under normal, daytime conditions, I shoot in the range of 1/60th to 1/3200th of a second. I generally try to use the fastest speed that the light will allow. The faster the shutter, the less chance I will cause the image to be blurry by shaking the camera. This type of blur is called “motion blur”, and causes everything in your pictures to appear out of focus. If I’m going to hand-hold my camera (not use a tripod), I won’t set it below 1/60th of a second. It is next to impossible to hold still enough at this speed.
Take a look at the three photos below to see the effects of shutter speed. I’ve kept all the variables the same (Subject, time of day, aperture, white balance, iso camera location) except shutter speed.
This image has the “fastest” shutter speed. 1/2500th of a second.
This image is a little slower. 1/2500th of a second.

This is the slowest image 1/800th of a second.

Notice that the photos get darker the faster the shutter speed is. This is because less light is hitting the sensor. 1/2500th of a second’s worth of light vs. 1/800th of a second.
So, when shooting in the manual mode, I set the aperture, and then adjust the shutter speed until the image is exposed properly. The camera will also do this automatically for you if you shoot in Aperture Priority Mode.
Friday, August 21, 2009
Photography: It’s all about Light
When thinking about photography, it all really comes down to light. That’s what goes onto the cameras sensor, and that is what makes an image. Exposing the perfect picture comes down to your ability to control the light that comes into the camera. There are three settings on your camera that really control the light coming in.
- 1. Aperture: The size of the “hole” light comes through to your sensor
- 2. Shutter Speed: The amount of time light is being captured by the sensor
- 3. ISO: The sensitivity of your sensor.
I’ll cover each of these in separate blog posts. But being able to control these three settings are what will enable you to capture that perfect shot. These all three come together to become the “exposure” of the picture. You’ve probably heard the term “overexposed” or “underexposed” before. By changing aperture, shutter speed, and ISO, you can control the amount of light in the picture and get the perfect exposure.
Below are three examples of exposure:
Underexposure
Overexposure

Correct Exposure
Thursday, August 20, 2009
Adobe Photoshop Lightroom: A great way to organize images.
Full Disclosure: I work for Adobe, so I may be biased… however, I don’t recommend anything I don’t use myself.
I’ve been using Photoshop Lightroom for over a year now, and I still love it. Prior to finding Lightroom, I’d been taking digital pictures for about 8 years, and had never come up with a system that I liked for storing and cataloging images. I’d tried using Windows Explorer file system, iPhoto, and up until last year, I was pretty happy with Picasa, but Lightroom has blown them all away.
There are several functions in Lightroom beyond just organizing (all of which I love), but for just remembering what/where/when you took a picture, the Library module in Lightroom is awesome. Right from importing your photos from you camera, it keeps everything in one place. For safety, it automatically makes copies of your pictures for auto-backup. (having lost a lot of data, I can’t stress this enough).
I’m gonna spend a lot of time talking about Lightroom in this blog as I learn more. It is super powerful and has tons of features that’ll probably take me months to learn, however if you use it as nothing more than just an organizer, you’ll still be happy.
A couple things to point out: Lightroom 2 is available for a free 30-day trial from Adobe.
Also, to get started using the software, I highly recommend the Lynda.com training It’s done by Chris Orwig and really helped get me going with the software.
Wednesday, August 19, 2009
Using Autofocus
The ability for a camera to automatically focus is awesome. The fact that your camera can look at an object, determine if it is sharp enough, and change the focus blows me away every time. When I first got my DSLR cameras, one thing I’ve noticed is that it was unpredictable on what it would focus on. I’d look through the viewfinder, and want to focus on the person in my shot, and it would focus on some leaf in the foreground. Or it would focus on the closest person instead of the person in the middle. Turns out, my Nikon has some settings for the focus mode that I didn’t know about. The factory had it set to focus on the closest object, regardless of where it was. This wasn’t working for me, because I didn’t always want the closest object in focus.
What I’ve done to simplify my life and make my autofocus only focus on what is in the direct center of my viewfinder. Looking through my Nikon, (D40) I have an indicator that looks like:

These boxes are the focus area indicators. I’ve changed the settings in the back menu (check your manual to see what menu), so that only the center square is put in focus.
I know what you are saying, “what if I don’t want the center to be in focus, what if I want something on the right or left to be in focus. I that case you put the item you want to focus on in the center brackets, press the shutter button half way down and then re-compose you image. This blog talks about some of the other features of autofocusing that I won’t rewrite here: http://www.kenrockwell.com/nikon/d80/af-settings.htm
I also noticed that sometimes the camera wouldn't focus, it just kept searching, and never finds a focus distance. The autofocus in your camera uses lines of contrast to focus. So you need to look at the edge of an object to get the camera to focus. It you are trying to focus on something all the same color, the camera won’t know how to make it sharp
Subscribe to:
Posts (Atom)


